This is super useful when your workloads have special requirements—like needing SSD storage, a GPU, or high memory. Instead of leaving it up to chance, Node Selectors make sure your workloads land exactly where they belong.
What is the role of Node Selectors in Kubernetes?
Imagine you’re running a Kubernetes cluster with a mix of different nodes. Some are high-performance machines with GPUs. Others are basic nodes with minimal resources. You probably don’t want your critical workloads stuck on the smallest node in the cluster, right?
That’s where Node Selectors come in. They help you:
- Keep heavy workloads on powerful nodes
- Run storage-intensive pods on SSD-backed nodes
- Separate test environments from production workloads
And best of all? They’re incredibly easy to use.
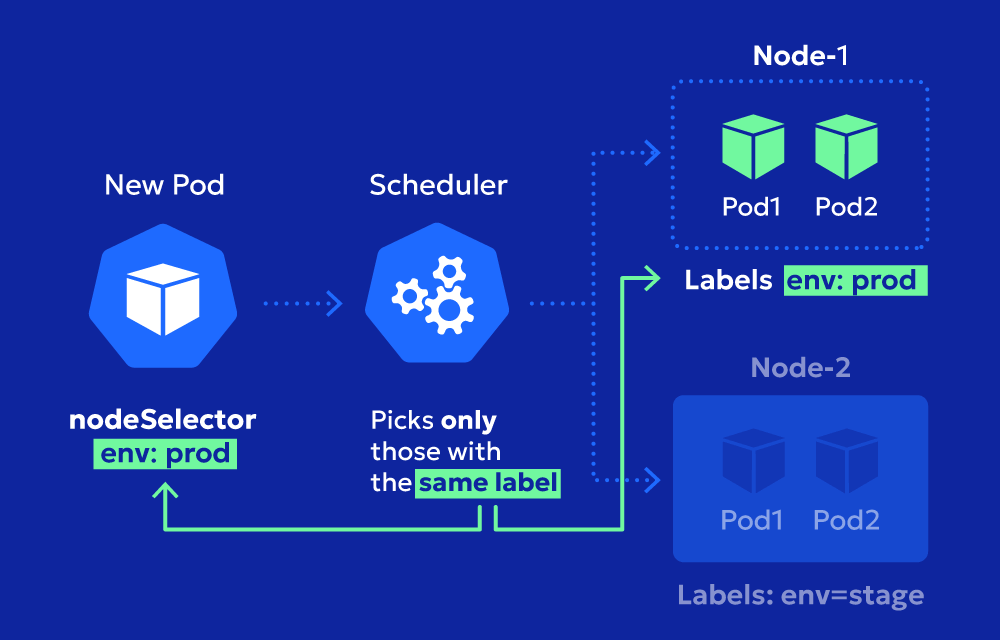
How Does a Node Selector Work?
It’s a two-step process:
1. Label Your Nodes
First, add labels to your nodes to describe their capabilities. For example:
  kubectl label nodes node-1 disktype=ssd
kubectl label nodes node-2 disktype=hdd
This helps Kubernetes understand which nodes have which features.
2. Add the Node Selector to Your Pod
Next, update your pod’s YAML file with a nodeSelector. Here’s a quick example:
  apiVersion: v1
kind: Pod
metadata:
  name: example-pod
spec:
  nodeSelector:
    disktype: ssd
  containers:
  - name: nginx
    image: nginx
In this case, the pod will only run on nodes labeled disktype=ssd. If there are no matching nodes, the pod will stay pending until there is one.
When Should You Use Node Selectors?
Use Node Selectors when you need simple and guaranteed control over where your pods run. They’re perfect for:
- Pinning workloads to certain hardware types.
- Separating environments (like dev, staging, and production).
- Ensuring compliance, such as running workloads on specific geographic nodes.
Limitations to Watch Out For
While Node Selectors are great for basic scheduling, they do have some drawbacks:
- They’re all-or-nothing. If no node matches the labels, your pod won’t run.
- No flexibility. You can’t set priorities or preferences—just exact matches.
- Manual upkeep. As your cluster grows, managing labels can get messy.
For more complex scenarios, Kubernetes offers alternatives like Node Affinity, which lets you define more advanced rules and even set preferences.
Node Selector vs. Node Affinity: What’s the Difference?
| Feature | Node Selector | Node Affinity |
|---|---|---|
| Matching | Exact key-value match | Supports operators and expressions |
| Flexibility | Basic | Advanced (with soft/hard rules) |
| Use Case | Simple filtering | Complex placement strategies |
If you just want a quick and easy way to steer a pod to specific nodes, Node Selectors do the job. But if you’re managing large-scale or dynamic environments, Node Affinity might serve you better.
Key Takeaways
- Node Selectors let you target pods to nodes using simple key-value labels.
- They’re perfect for small clusters or straightforward scheduling needs.
- For advanced scenarios, check out Node Affinity or Taints and Tolerations.
See Also
- Kubernetes Documentation: Assign Pods to Nodes
- Control the K8s scheduler with node affinity and selector
- Taints and Tolerations Explained
FAQ
What happens if no node matches my Node Selector?
Your pod will stay in a Pending state until a matching node becomes available.
Can I use multiple Node Selectors?
No. Node Selectors only support simple key-value pairs. For more complex logic, switch to Node Affinity.
Are Node Selectors the same as Taints and Tolerations?
Nope! Node Selectors tell Kubernetes where a pod should go. Taints and Tolerations prevent pods from going where they shouldn’t.