This article breaks down how DaemonSets work, when to use them, and provides practical examples to help you implement them effectively.
How DaemonSets Work
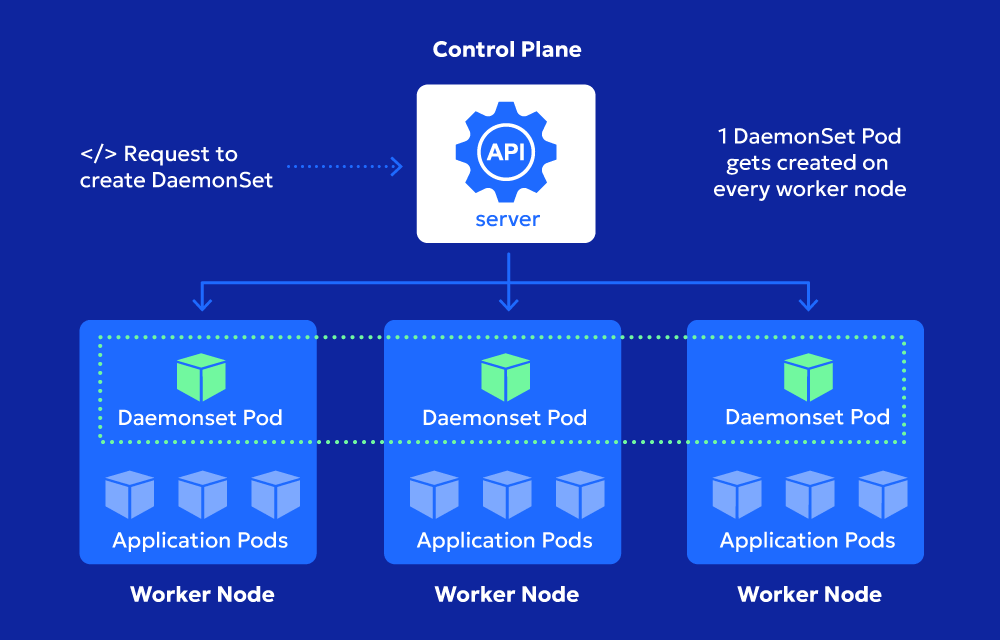
A DaemonSet is a Kubernetes controller that ensures a pod is scheduled on all eligible nodes. Unlike Deployments or ReplicaSets, which manage multiple identical pod replicas that scale independently, a DaemonSet guarantees that only one instance of a specific pod runs per node.
Key Features of DaemonSets
- Ensures pod deployment on all (or some) nodes
- Runs continuously as nodes are added or removed
- Does not require manual scaling
- Ideal for node-level services like log collection, monitoring, and networking agents
Use Cases for DaemonSets
DaemonSets are commonly used for:
- Monitoring and logging (e.g., Prometheus Node Exporter, Fluentd, Logstash)
- Security agents (e.g., Falco, AppArmor monitors)
- Networking services (e.g., CNI plugins, kube-proxy)
- Storage daemons (e.g., Ceph, GlusterFS clients)
Creating a DaemonSet: Step-by-Step Example
To create a DaemonSet, define a YAML configuration specifying the pod template and node selection criteria.
Example: Deploying a Simple Log Collector
  apiVersion: apps/v1
kind: DaemonSet
metadata:
  name: log-collector
  labels:
    app: logging
spec:
  selector:
    matchLabels:
      app: logging
  template:
    metadata:
      labels:
        app: logging
    spec:
      containers:
      - name: log-collector
        image: busybox
        command: ["/bin/sh", "-c", "while true; do echo 'Collecting logs...'; sleep 30; done"]
Explanation of Key Components
- apiVersion: apps/v1 → Uses the
apps/v1API for managing workloads. - kind: DaemonSet → Defines this as a DaemonSet.
- metadata: → Assigns a name and labels to the resource.
- spec:
- selector: → Ensures pods match labels for proper management.
- template: → Defines the pod spec with a logging container running a simple script.
Deploying the DaemonSet
To apply the above DaemonSet configuration, run:
kubectl apply -f daemonset.yaml
Verify the DaemonSet:
kubectl get daemonsets
Check running pods:
kubectl get pods -o wide
Node Selection with DaemonSets
By default, a DaemonSet runs on all nodes, but you can limit it to specific nodes using labels and nodeSelector.
Example: Running a DaemonSet on Specific Nodes
If you want your DaemonSet to run only on nodes labeled logging=true, modify the spec:
  spec:
  template:
    spec:
      nodeSelector:
        logging: "true"
Apply this label to nodes:
kubectl label nodes my-node logging=true
Updating a DaemonSet
Updating a DaemonSet is different from Deployments because pods are managed per node. To update a DaemonSet safely:
- Modify the DaemonSet YAML
- Apply changes using
kubectl apply -f daemonset.yaml - Ensure pods are replaced automatically with the updated version
To check rollout status:
kubectl rollout status daemonset/log-collector
If a pod is not updated, you may need to force a restart:
kubectl delete pod -l app=logging
Deleting a DaemonSet
To remove a DaemonSet and all associated pods:
kubectl delete daemonset log-collector
If you want to keep the pods running even after deleting the DaemonSet, use:
kubectl delete daemonset log-collector --cascade=orphan
Best Practices for DaemonSets
- Use resource requests and limits to prevent excessive resource consumption:
resources: requests: cpu: "100m" memory: "256Mi" limits: cpu: "500m" memory: "512Mi" - Use affinity rules to ensure proper pod distribution.
- Monitor DaemonSets with Prometheus or
kubectl get daemonsets -o wide. - Ensure security compliance by running containers as non-root when possible.
Summary
DaemonSets are a powerful way to ensure critical services run consistently across Kubernetes nodes. Whether for monitoring, security, or networking, they provide node-level reliability without manual scaling.
By following best practices and using node selectors effectively, you can make the most of DaemonSets in your cluster.
Want to dig deeper? Try deploying your own DaemonSet and experiment with different scheduling strategies!


