Managing resource usage in Kubernetes can be a double-edged sword. Set the wrong limits, and you might throttle your application into poor performance. Set no limits at all, and you risk one rogue pod consuming all available resources, bringing down other workloads.
So, when should you set resource limits? When shouldn’t you? And how do you balance control with flexibility? Let’s break it down.
What Are Resource Limits in Kubernetes?
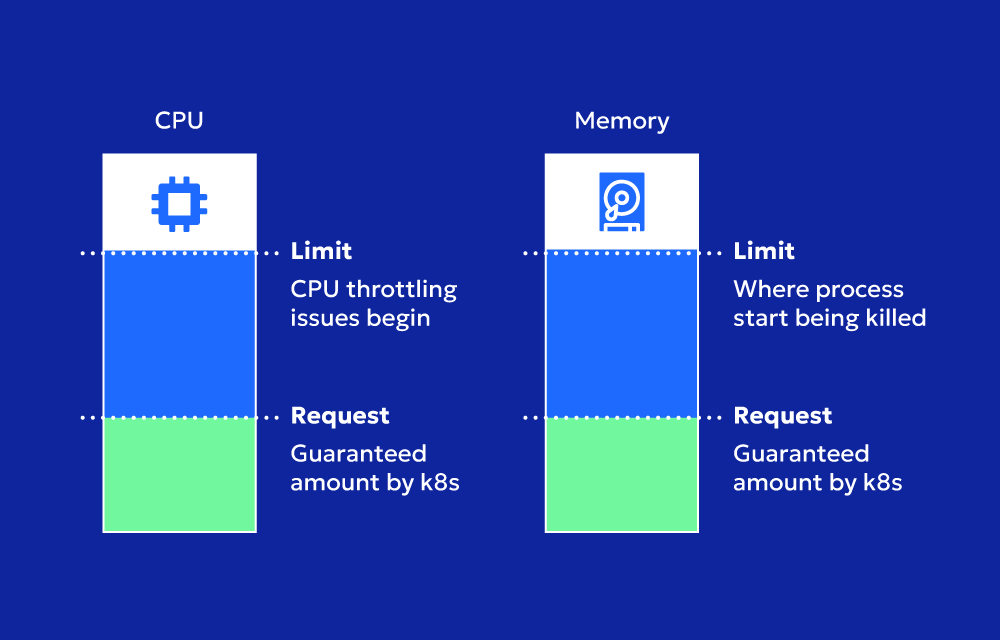
In Kubernetes, resource limits define the maximum amount of CPU and memory (RAM) a container can consume. These limits help the Kubelet and scheduler manage workloads efficiently, ensuring that a single container doesn’t hog resources at the expense of others.
You typically define limits inside a pod’s YAML configuration like this:
  apiVersion: v1
kind: Pod
metadata:
  name: example-pod
spec:
  containers:
  - name: example-container
    image: nginx
    resources:
      limits:
        memory: "256Mi"
        cpu: "500m"  # 500 millicores = 0.5 CPU
      requests:
        memory: "128Mi"
        cpu: "250m"
Here’s what happens:
- The container requests 128Mi of memory and 250m (0.25) CPU to run.
- The container cannot exceed 256Mi of memory or 500m (0.5) CPU.
When Should You Set Resource Limits?
Setting resource limits is crucial in specific scenarios where uncontrolled resource consumption can lead to failures or inefficiencies.
1. Multi-Tenant Clusters (Preventing Noisy Neighbors)
If you’re running a multi-tenant cluster (multiple teams sharing the same cluster), resource limits prevent one team’s workloads from affecting others. Without limits, one runaway pod could consume all available CPU and memory, starving other applications.
Example:
- A shared Kubernetes cluster hosting multiple microservices from different teams.
- Limits ensure that one team’s misconfigured pod doesn’t overwhelm the cluster, leading to outages.
2. Autoscaling Environments (Avoiding Unpredictable Scaling)
In autoscaling environments, Kubernetes scales workloads based on CPU and memory usage. Without limits, some workloads may trigger autoscaling too aggressively, leading to cost spikes and instability.
Example:
- A workload running on a cloud-based Kubernetes cluster (EKS, GKE, AKS) with Horizontal Pod Autoscaler (HPA) enabled.
- Limits ensure that one pod doesn’t consume all CPU, which could otherwise trigger excessive scaling.
3. Preventing Memory Overcommitment (Avoiding OOM Kills)
Kubernetes does not handle memory overcommitment well. If a pod consumes more memory than available, the OOM (Out of Memory) Killer terminates it without warning.
Example:
- A memory-intensive application (e.g., Java, Node.js, or machine learning workloads) without limits might consume excessive memory.
- With limits, Kubernetes kills only the offending container, preventing cluster-wide failures.
4. Running in a Resource-Constrained Cluster
If your cluster runs on bare-metal or limited cloud instances, setting limits ensures workloads don’t overuse available resources, keeping everything running smoothly.
Example:
- Running a self-hosted K8s cluster on-premises with fixed compute capacity.
- Limits ensure that critical services always have enough resources to function.
When Should You NOT Set Resource Limits?
While limits prevent resource abuse, they can negatively impact performance in certain scenarios.
1. High-Performance Applications (Avoid CPU Throttling)
Setting CPU limits can lead to CPU throttling, where Kubernetes artificially restricts CPU usage even when excess CPU is available.
Example:
- A real-time analytics service running on Kubernetes.
- If CPU limits are too strict, the service might get throttled, leading to performance degradation and increased latency.
- Solution: Use requests instead of limits to allow burstable CPU usage.
2. Stateless Applications in Auto-Scaling Environments
For workloads that can scale dynamically, strict limits may not be necessary. Instead of limiting resources, you can rely on Horizontal Pod Autoscaler (HPA) to handle scaling.
Example:
- A stateless API server running behind a load balancer.
- If traffic spikes, instead of limiting CPU usage, allow HPA to scale pods dynamically.
3. Pods with Unknown Resource Needs (Trial and Error Phase)
If you don’t know the actual resource consumption of an application, setting limits too early can lead to misconfigurations.
Example:
- Deploying a new AI model inference service.
- Initially, you might not know how much CPU and RAM it needs.
- Solution: Use Vertical Pod Autoscaler (VPA) to gradually determine the correct limits.
Best Practices for Setting Resource Limits
- Start with resource requests, then add limits only if necessary.
- Avoid CPU limits unless absolutely needed (to prevent throttling).
- Use monitoring tools like Prometheus + Grafana to analyze real-world usage before setting limits.
- Consider using Vertical Pod Autoscaler (VPA) instead of hard limits for workloads with fluctuating needs.
- Regularly review limits as application performance and traffic patterns change.
Wrapping it up
Setting resource limits in Kubernetes isn’t a one-size-fits-all decision. They protect shared clusters, prevent crashes, and ensure stability, but they can also hinder performance if applied incorrectly.
If you’re running critical workloads in production, the best approach is to monitor actual resource consumption first before setting hard limits. CPU limits should be used cautiously, while memory limits are crucial for preventing crashes.
By understanding when to use them—and when to avoid them—you can keep your Kubernetes clusters optimized, cost-efficient, and reliable.